Replacing CC3DML with equivalent Python syntax
Some modelers prefer using Python only and skipping XML entirely. CC3D has special Python syntax that allows users to replace CC3DML with Python code. Manual conversion is possible but as you can predict quite tedious. Fortunately Twedit++ has nice shortcuts that converts existing CC3DML (and for that matter any XML) into equivalent Python syntax that can be easily incorporated into CC3D code. In Twedit++ all you have to is is to right click XML file in the project panel and you will see option Convert XML To Python. When you choose this option Twedit++ will gegerate Python syntax which can replace your XML:
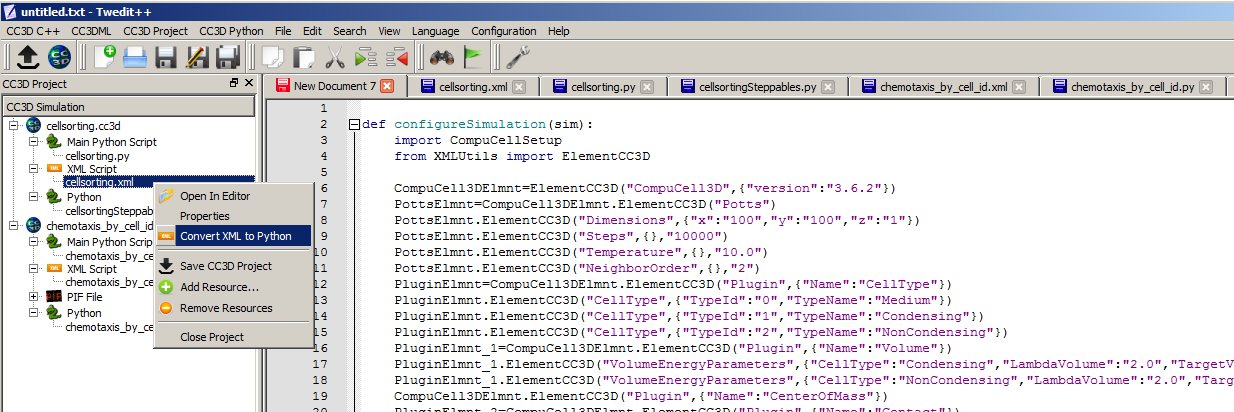
Figure 17 Generating Python code that replaces XML in Twedit++.
If we look at the XML code:
<CompuCell3D version="3.6.2">

   <Potts>
      <Dimensions x="100" y="100" z="1"/>
      <Steps>10000</Steps>
      <Temperature>10.0</Temperature>
      <NeighborOrder>2</NeighborOrder>
   </Potts>

   <Plugin Name="CellType">
      <CellType TypeId="0" TypeName="Medium"/>
      <CellType TypeId="1" TypeName="Condensing"/>
      <CellType TypeId="2" TypeName="NonCondensing"/>
   </Plugin>

   <Plugin Name="Volume">
      <VolumeEnergyParameters CellType="Condensing"
      LambdaVolume="2.0" TargetVolume="25"/>
      <VolumeEnergyParameters CellType="NonCondensing"
      LambdaVolume="2.0" TargetVolume="25"/>
   </Plugin>
And then at equivalent Python code:
def configureSimulation():

    from cc3d.core.XMLUtils import ElementCC3D

    CompuCell3DElmnt = ElementCC3D("CompuCell3D", {"version": "4.0.0"})
    PottsElmnt = CompuCell3DElmnt.ElementCC3D("Potts")
    PottsElmnt.ElementCC3D("Dimensions", {"x": "100", "y": "100", "z": "1"})
    PottsElmnt.ElementCC3D("Steps", {}, "10000")
    PottsElmnt.ElementCC3D("Temperature", {}, "10.0")
    PottsElmnt.ElementCC3D("NeighborOrder", {}, "2")
    PluginElmnt = CompuCell3DElmnt.ElementCC3D("Plugin", {"Name": "CellType"})
    PluginElmnt.ElementCC3D("CellType", {"TypeId": "0", "TypeName": "Medium"})
    PluginElmnt.ElementCC3D("CellType", {"TypeId": "1", "TypeName": "Condensing"})
    PluginElmnt.ElementCC3D("CellType", {"TypeId": "2", "TypeName": "NonCondensing"})
    PluginElmnt_1 = CompuCell3DElmnt.ElementCC3D("Plugin", {"Name": "Volume"})
    PluginElmnt_1.ElementCC3D("VolumeEnergyParameters",
                              {"CellType": "Condensing", "LambdaVolume": "2.0", "TargetVolume": "25"})
    PluginElmnt_1.ElementCC3D("VolumeEnergyParameters",
                              {"CellType": "NonCondensing", "LambdaVolume": "2.0", "TargetVolume": "25"})
We can see that there is one-to-one correspondence. We begin by creating top level element CompuCell3D:
CompuCell3DElmnt = ElementCC3D("CompuCell3D", {"version": "4.0.0"})
We attach a child element (Potts) to CompuCell3D element and a return
value of this call is object representing Potts element:
We looks at the XML and notice that Potts element has several child
elements – e.g. Dimensions, Temperature etc… We attach all of these
child elements to Potts element:
PottsElmnt.ElementCC3D("Dimensions", {"x": "100", "y": "100", "z": "1"})
PottsElmnt.ElementCC3D("Temperature", {}, "10.0")
We hope you see the pattern. The general rule is this. To create root
element you use function ElementCC3D from XMLUtils` – see how we created
``CompuCell3D element. When you want to attach child element we call
ElementCC3D member function of the parent element e.g.:
PluginElmnt = CompuCell3DElmnt.ElementCC3D("Plugin", {"Name": "CellType"})
This syntax can bepresented in a more general form:
childElementObject = parentElementObject.ElementCC3D(Name_Of_Element, {attributes}, Element_Value)
Each call to ElementCC3D returns ElementCC3D object. When we call
ElementCC3D to create root element (here CompuCell3D) this call will
return root element object. When we call ElementCC3D to attach child
element this call returns child element object.
Notice that at the end of the autogenerated Python code replacing XML we have function the following line:
CompuCellSetup.setSimulationXMLDescription(CompuCell3DElmnt)
This line is actually very important and it passes root element of the
CC3DML to the CompuCell3D core code for initialization. It is
interesting that by passing just one node (one object representing single
XML element – here CompuCell3D) we are are actually passing entire XML.
As you probably can guess, this is because we are dealing with recursive
data structure.
Notice as well that our code sits inside configureSimulation function,
We need to call this function from Python main script to ensure that XML
replacement code gets processed. See
Demos/CompuCellPythonTutorial/PythonOnlySimulations for examples of a
working code:
from cc3d import CompuCellSetup


def configure_simulation():
    from cc3d.core.XMLUtils import ElementCC3D

    cc3d = ElementCC3D("CompuCell3D")
    potts = cc3d.ElementCC3D("Potts")
    potts.ElementCC3D("Dimensions", {"x": 100, "y": 100, "z": 1})

    ...

    CompuCellSetup.setSimulationXMLDescription(cc3d)


configure_simulation()

CompuCellSetup.run()
The actual placement of configureSimulation function in the main script matters. It has to be called right before
CompuCellSetup.run()
Finally, one important remark: Twedit++ has CC3DML helper menu which pastes ready-to-use CC3DML code for all available modules. This means that when you work with XML and you want to add cell types, insert syntax for new modules etc… You can do it with a single click. When you work with Python syntax replacing XML, all modifications to the autogenerated code must be made manually.