Automatic Tracking of Cells’ Attributes
Sometimes you would like to color-code cells based on the value (scalar or vector) of one of the cellular attributes. You can use the techniques presented above to display cell-level scalar or vector field or you can take advantage of a very convenient shortcut that using one line of code allows you to setup up visualization field that tracks cellular attributes. Here is a simple example:
class DemoVisSteppable(SteppableBasePy):
    def __init__(self, _simulator, _frequency=1):
        SteppableBasePy.__init__(self, _simulator, _frequency)
        self.track_cell_level_scalar_attribute(field_name='COM_RATIO',attribute_name='ratio')

    def start(self):
        for cell in self.cellList:
            cell.dict['ratio'] = cell.xCOM / cell.yCOM

    def step(self, mcs):
        for cell in self.cellList:
            cell.dict['ratio'] = cell.xCOM / cell.yCOM
In the start and step functions we iterate over all cells and attach a
cell attribute ratio that is equal to the ration of x and y center-of
mass coordinates for each cell. In the init function we setup automatic
tracking of this attribute i.e. we create a cell-level scalar field
(called COM_RATIO) where cells are colored according to the value of
their ‘ratio’ attribute:
self.track_cell_level_scalar_attribute (field_name='COM_RATIO',attribute_name='ratio')
The syntax of this function can be found in Twedit Python helper menu:
CC3D Python->Extra Fields Automatic Tracking -> Track Scalar Cell
Attribute (__init__) :

Figure 15 Setting up automatic tracking of cells’ scalar attribute using Twedit++
Sometimes instead of tracking the actual attribute we would lie to
color-code cells according to the user-specified function of the
attribute. For example instead of color-coding cells according to ration
of x and y center-of-mass coordinates we would lie to color-code them
according to a sinus of the ratio:
class DemoVisSteppable(SteppableBasePy):
    def __init__(self, _simulator, _frequency=1):
        SteppableBasePy.__init__(self, _simulator, _frequency)
        self.track_cell_level_scalar_attribute(field_name='COM_RATIO',
                                               attribute_name='ratio')

        import math
        self.track_cell_level_scalar_attribute(field_name='SIN_COM_RATIO',
                                               attribute_name='ratio',
                                               function=lambda attr_val: math.sin(attr_val))

    def start(self):
        for cell in self.cellList:
            cell.dict['ratio'] = cell.xCOM / cell.yCOM

    def step(self, mcs):
        for cell in self.cellList:
            cell.dict['ratio'] = cell.xCOM / cell.yCOM
All we did in the snippet above was to add new field SIN_COM_RATIO using
the track_cell_level_scalar_attribute function.
The call to this function almost identical as before except now we also used function argument:
function = lambda attr_val: math.sin(attr_val)
The meaning of this is the following: for each attribute ratio
attached to a cell a function math.sin(attr_val) will be evaluated
where attr_val will assume same value as ‘ratio’ cell attribute for a
given cell. If you are puzzled about lambda Python key word don’t be.
Python lambda’s are a convenient way to define inline functions For
example:
f = lambda x: x**2
defines function f that takes one argument x and returns its square.
Thus, f(2) will return 4 and f(4) would return 16.
Lambda function can be replaced by a regular function f as follows:
def f(x):
    return x**2
When we run the simulation above the output may look like in the figure below:
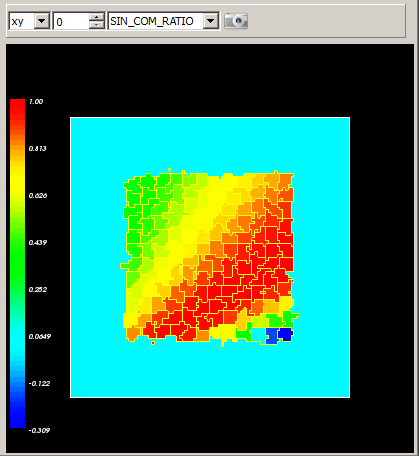
Figure 16. Automatic labeling of cells according to scala cell’s attribute
Now that we learned how to color-code cells according to the custom attribute we can use analogous approach to label cells using vector attribute. Important: vector quantity must be a list, tuple or numpy array with 3 elements.
The steppable code below demonstrates how we can enable auto-visualization of the cell’s vector attribute:
class DemoVisSteppable(SteppableBasePy):

    def __init__(self,_simulator,_frequency=1):
        SteppableBasePy.__init__(self,_simulator,_frequency)
        self.track_cell_level_vector_attribute (field_name = 'COM_VECTOR',\
        attribute_name = 'com_vector')
        import math
        self.track_cell_level_vector_attribute (field_name = 'SIN_COM_VECTOR',\
        attribute_name = 'com_vector',\
        function = lambda attr_val: [ math.sin(attr_val[0]), math.sin(attr_val[1]), 0] )

    def start(self):
        for cell in self.cellList:
            cell.dict['com_vector'] = [cell.xCOM, cell.yCOM, 0.0]

    def step(self,mcs):
        for cell in self.cellList:
            cell.dict['com_vector'] = [cell.xCOM, cell.yCOM, 0.0]
There are few differences as compared to the code that used scalar quantities:
1) we used self.track_cell_level_vector_attribute in the __init__ constructor,
2) our attributes are vectors:
cell.dict['com_vector'] = [cell.xCOM, cell.yCOM, 0.0]
3) the lambda function we use takes a single argument which is this case is a vector (i.e. it has 3 elements) and also returns 3 element vector.