How to programmatically control every aspect of the simulation
Note
The features described in this section are available as of CompuCell3D version 4.4.0.
Most new users start learning CompuCell3D by configuring and editing simulations in Twedit GUI and then running them via Player GUI. Starting from version 4.4.0, CompuCell3D is shipped with an upgraded Python API that allows modelers to bypass both Player and Twedit and configure simulations - or even an ensemble of multiple simulations running in parallel and informing each other - directly from a single Python script. This way of constructing simulations gives users full control over every aspect of the simulation. The material presented in this section explains:
how to configure the entire simulation in pure Python (i.e., without XML)
how to write and control the main CC3D loop where, at every step, we call the Potts algorithm
how to run multiple concurrent and interacting simulations
how to specify and control visualization
how to use Jupyter notebook.
In a sense, this tutorial shows an alternative way of specifying and running simulations that bypasses legacy tools like Twedit++ and Player. It gives you full programmatic control of the CC3D simulation.
We recommend that you use PyCharm or VS Code if you decide to work with the API presented in this section
Overview
CC3D Projects vs. Python Projects
The Twedit and
Player GUIs facilitate the generation, development,
execution and sharing of simulations in a project structure that can consist of
Python and CC3DML source
code, auxiliary resources (e.g.,
PIF files)
and a .cc3d project file that describes the contents of a CC3D project.
This structure is the officially supported CC3D project structure that the complete
distribution of CC3D packages supports.
However, arbitrary Python projects, which can consist of one or hundreds of Python
source files, can also integrate CC3D to support biological modeling and simulation
in integrated applications. CC3D provides basic support for such applications through an
extensive Python API that makes available all built-in plugins and steppables for model specification,
as well as interactive control over simulation execution through memory-safe objects that contain
simulation instances.
In general, the cc3d python module contains the entire CC3D Python runtime API.
CC3D projects typically define plugins and steppables in
CC3DML and custom
steppables in a single Python script, the complete project of which can be loaded in the
Player GUI.
In Python projects, model and simulation specification through the Python API requires
Python instructions to create a simulation object, create plugin and steppable objects,
register the plugins and steppables with the simulation object, and then execute the simulation
along with optional instructions for real-time visualization. As such, Python projects
tend to require more startup work to accomplish tasks that are performed by the
Player GUI but can develop and support more
advanced and specific functionality.
CC3D Python Interactive Simulation
The new CC3D Python API gives users a direct access to a live, interactive CC3D simulation via
CC3DSimService object. Executing a simulation using
CC3DSimService consists of creating a CC3DSimService instance, loading it with
model and simulation specification, performing simulation startup routines,
executing simulation steps, performing what interactions may be appropriate for an
application (e.g., steering), and ultimately performing simulation shutdown routines.
from cc3d.CompuCellSetup.CC3DCaller import CC3DSimService

cc3d_sim = CC3DSimService()     # Create a simulation
# Load specification here...
cc3d_sim.run()                  # Start the underlying process of the simulation
cc3d_sim.init()                 # Execute the simulation initialization stage
cc3d_sim.start()                # Execute the simulation startup stage (e.g., steppable `start` is called)
cc3d_sim.step()                 # Execute one simulation step
cc3d_sim.finish()               # Execute the simulation finalization stage (e.g., steppable `finish` is called)
CC3DSimService supports executing an arbitrary number of custom steppables during
simulation through a registration method register_steppable.
Passing a steppable class to register_steppable registers a
steppable to be called at specified step intervals, and the CC3DSimService
instance will instantiate the steppable during simulation startup.
Custom Python steppables with the Python API provide a straightforward way to
perform manipulations to simulation data during execution of a simulation, even
by simple module-level variables,
from cc3d.CompuCellSetup.CC3DCaller import CC3DSimService
from cc3d.core.PySteppables import SteppableBasePy

# Define volume parameters
target_volume_init = 25             # Initial target volume
lambda_volume = 2                   # Volume constraint parameter
target_volume = target_volume_init  # Current target volume; varies during simulation

class GrowthSteppable(SteppableBasePy):
    """
    A custom steppable that uniformly applies a volume constraint
    """

    def start(self):
        """Applies initial volume parameters to all cells during startup"""
        for cell in self.cell_list:
            cell.targetVolume = target_volume_init
            cell.lambdaVolume = lambda_volume

    def step(self, mcs):
        """Updates the target volume of all cells every 100 steps"""
        if mcs % 100 == 0:
            # Whatever the value of the variable `target_volume`, apply it to all cells
            for cell in self.cell_list:
                cell.targetVolume = target_volume

# Launch a simulation and register GrowthSteppable
cc3d_sim = CC3DSimService()
# Load specification here...
cc3d_sim.register_steppable(steppable=GrowthSteppable, frequency=1)
cc3d_sim.run()
cc3d_sim.init()
cc3d_sim.start()

# Execute 10k steps and update the target volume along the way
num_steps = 10000
while cc3d_sim.current_step < num_steps:
    target_volume = target_volume_init * (1.0 + cc3d_sim.current_step / num_steps)
    cc3d_sim.step()
CC3DSimService.register_steppable also supports registering a steppable instance,
which can be used to perform operations with both the steppable and its interface to
simulation core objects and convenience features,
from cc3d.CompuCellSetup.CC3DCaller import CC3DSimService
from cc3d.core.PySteppables import SteppableBasePy

# Define volume parameters
target_volume_init = 25             # Initial target volume
lambda_volume = 2                   # Volume constraint parameter
target_volume = target_volume_init  # Current target volume; varies during simulation

# Launch a simulation and register a generic steppable instance
cc3d_sim = CC3DSimService()
# Load specification here...
steppable = SteppableBasePy()
cc3d_sim.register_steppable(steppable=steppable)
cc3d_sim.run()
cc3d_sim.init()
cc3d_sim.start()

for cell in steppable.cell_list:
    cell.targetVolume = target_volume_init
    cell.lambdaVolume = lambda_volume

# Execute 10k steps and update the target volume along the way using the steppable interface
num_steps = 10000
while cc3d_sim.current_step < num_steps:
    if cc3d_sim.current_step % 100 == 0:
        target_volume = target_volume_init * (1.0 + cc3d_sim.current_step / num_steps)
        for cell in steppable.cell_list:
            cell.targetVolume = target_volume
    cc3d_sim.step()
Python Built-In Plugins and Steppables
Note
All features described in this section can also be employed in CC3D projects. In such cases, an all-Python CC3D project can be generated in the Twedit GUI, and all plugins and steppables can be specified using the Python API described in this section.
The CC3D Python module cc3d.core.PyCoreSpecs provides an interactive object for
using each built-in plugin and steppable in simulation. Each interactive object
in the cc3d.core.PyCoreSpecs module contains all internal data necessary to create
a corresponding built-in plugin or steppable, which can be manipulated through the
interface of each interactive object.
For example, a typical simulation specification consists of the
Potts specification,
CellType,
Volume and
Contact
plugins and a
BlobInitializer steppable
to initialize a cell distribution, which can look like the following when using the Python API,
from cc3d.CompuCellSetup.CC3DCaller import CC3DSimService
from cc3d.core.PyCoreSpecs import PottsCore, CellTypePlugin, VolumePlugin, ContactPlugin

# Specify a two-dimensional simulation with a 100x100 lattice and second-order Potts neighborhood.
potts_specs = PottsCore(dim_x=100, dim_y=100, neighbor_order=2)
# Define two cell types called "Condensing" and "NonCondensing".
cell_type_specs = CellTypePlugin("Condensing", "NonCondensing")
# Assign a volume constraint to both cell types.
volume_specs = VolumePlugin()
volume_specs.param_new("Condensing",    target_volume=25, lambda_volume=2)
volume_specs.param_new("NonCondensing", target_volume=25, lambda_volume=2)
# Assign adhesion between cells by type.
contact_specs = ContactPlugin(neighbor_order=2)
contact_specs.param_new(type_1="Medium",        type_2="Condensing",    energy=20)
contact_specs.param_new(type_1="Medium",        type_2="NonCondensing", energy=20)
contact_specs.param_new(type_1="Condensing",    type_2="Condensing",    energy=2)
contact_specs.param_new(type_1="Condensing",    type_2="NonCondensing", energy=11)
contact_specs.param_new(type_1="NonCondensing", type_2="NonCondensing", energy=16)
# Initialize cells as a blob with a random distribution by type.
blob_init_specs = BlobInitializer()
blob_init_specs.region_new(width=5, radius=20, center=(50, 50, 0), cell_types=("Condensing", "NonCondensing"))
A built-in plugin or steppable specification in the Python API consists of
creating an instance of its corresponding class, setting the internal data of the
instance and registering the instance with a CC3DSimService instance through
the method register_specs. Like in typical CC3D projects, every built-in plugin
and steppable that is registered with a CC3DSimService instance will automatically
function within the underlying simulation of the CC3DSimService instance for the
entire duration of the simulation,
# Launch a simulation and register all specifications
cc3d_sim = CC3DSimService()
cc3d_sim.register_specs([potts_specs, cell_type_specs, volume_specs, contact_specs, blob_init_specs])
cc3d_sim.run()
cc3d_sim.init()
cc3d_sim.start()
# Execution proceeds here...
For applications using a single CC3DSimService instance, instances of classes from the
cc3d.core.PyCoreSpecs module that correspond to built-in plugins and steppables that support
steering
provide a method steer. When steer is called on a registered cc3d.core.PyCoreSpecs
instance, the underlying built-in plugin or steppable is updated according to the internal data of the
cc3d.core.PyCoreSpecs instance,
from cc3d.CompuCellSetup.CC3DCaller import CC3DSimService
from cc3d.core.PyCoreSpecs import PottsCore, CellTypePlugin, VolumePlugin, LengthConstraintPlugin

# Previous specifications for Potts, Volume, etc.,  here...

# Specify a length constraint for the NonCondensing cell type
length_specs = LengthConstraintPlugin()
length_specs.params_new("NonCondensing", target_length=5, lambda_length=10)
# Launch a simulation and register all specifications
cc3d_sim = CC3DSimService()
cc3d_sim.register_specs([potts_specs, cell_type_specs, volume_specs, contact_specs, blob_init_specs, length_specs])
cc3d_sim.run()
cc3d_sim.init()
cc3d_sim.start()
# Execute 10k steps and update target length for the NonCondensing cell type along the way
num_steps = 10000
target_length_init = length_specs["NonCondensing"].target_length
while cc3d_sim.current_step < num_steps:
    if cc3d_sim.current_step % 100 == 0:
        target_length = target_length_init * (1.0 + cc3d_sim.current_step / num_steps)  # Calculate new length
        length_specs["NonCondensing"].target_length = target_length                     # Apply new length
        length_specs.steer()                                                            # Update the backend
    cc3d_sim.step()
Warning
Not every built-in plugin and steppable supports steering. Calling steer on a
cc3d.core.PyCoreSpecs module instance that does not support steering results in
a cc3d.core.PyCoreSpecs.SteerableError.
CC3D projects can also use cc3d.core.PyCoreSpecs objects to specify a simulation, and in the same
way. The single difference between their deployment in CC3D and Python projects is the process of
registration, which in CC3D projects is done through the CompuCellSetup.register_specs method in
the same way as through the CC3DSimService.register_specs method in Python projects.
Specification cannot mix cc3d.core.PyCoreSpecs objects and
CC3DML.
However, passing a list of cc3d.core.PyCoreSpecs objects to the method
cc3d.core.PyCoreSpecs.build_xml generates CC3DML data, and likewise
passing the absolute path to a .xml file containing a CC3DML specification, or
to a .cc3d file of a project that uses a CC3DML specification, to the method
cc3d.core.PyCoreSpecs.from_file generates a list of populated
cc3d.core.PyCoreSpecs objects.
Visualization in Python
The CC3D Python API provides support for real-time simulation data visualization. The
CC3DSimService method visualize creates a visualization frame that updates
according to simulation data updates and configurable options.
# Launch a simulation and register all specifications
cc3d_sim = CC3DSimService()
cc3d_sim.register_specs(specs)  # `specs` includes specifications for diffusion fields "F1" and "F2"
cc3d_sim.run()
cc3d_sim.init()
cc3d_sim.start()
# Show a frame of the cell field
cc3d_sim.visualize()
By default, CC3DSimService.visualize creates a frame that renders a two-dimensional
view of the cell field. However, CC3DSimService.visualize returns a reference to the
created frame that provides methods and properties to configure the frame, save an
image to file, etc.,
# Show another frame of the field "F1" and plot every 10 steps
frame_f1 = cc3d_sim.visualize(plot_freq=10)
frame_f1.field_name = "F1"
# Show a third frame of the field "F2", limit the frames per second to 60 and label the window
frame_f2 = cc3d_sim.visualize(fps=60, name="Field F2")
frame_f2.field_name = "F2"
# Set limits on the frame for F1
frame_f1.min_range_fixed = frame_f1.max_range_fixed = True
frame_f1.min_range = 0.0
frame_f1.max_range = 1.0
# Show another cell field frame, but visualize cluster borders instead of cell borders
frame_clusters = cc3d_sim.visualize(name="Clusters")
frame_clusters.cell_borders_on = False
frame_clusters.cluster_borders_on = True
# Save an image of the initial cluster configuration
frame_clusters.save_img(file_path="clusters.png")
Concurrent Interactive Simulations
The CC3D Python API supports execution of concurrent, interactive (and interacting) simulations.
While CC3D simulations are stateful in that creating two CC3DSimService instances in the same
process results in undefined behavior, the method service_cc3d creates a CC3DSimService
instance in a new, memory-isolated process using the SimService
Python package and returns a proxy to the CC3DSimService instance.
When using CC3DSimService proxies, applications can dynamically instantiate and simultaneously
orchestrate an arbitrary number of simulations.
from cc3d.core.simservice import service_cc3d

# Proxies of CC3DSimService instances, but memory-safe
cc3d_sim1 = service_cc3d()
cc3d_sim2 = service_cc3d()
Proxies returned by service_cc3d start with the same interface as their underlying
CC3DSimService instance and provide the same capability, though with some particularities
related to support for concurrent simulation.
In general, service_cc3d sets up a server-client architecture and relays information
between a CC3DSimService instance (server side) and its corresponding proxy
(client side) using a message passing interface.
The client-side process that calls service_cc3d receives a proxy as the returned value,
and the server-side CC3DSimService instance persists for as long as the proxy exists.
This architecture allows multiple simulations to execute the same core specification and custom
steppables, however the core specifications and custom steppables executed by a
CC3DSimService instance are not directly accessible (e.g., for steering) on the client side
to prevent memory conflicts between concurrent simulation.
Rather, the CC3D Python API provides alternative features to establish data pipelines with an
interactive simulation launched from service_cc3d.
CC3DSimService proxies have properties sim_input and sim_output
for basic data passing between the client side and the custom steppables executing in a
simulation on the server side.
When an object (e.g., a dictionary) is set on sim_input, the object is copied and
accessible to all custom steppables via the property external_input.
Likewise, any custom steppable can set an object on the steppable
property external_output, which is copied and forwarded when the CC3DSimService
proxy instance property sim_output is read.
For example, this data pipeline suffices to launch multiple concurrent simulations,
specify the initial location of cells, and report their final location,
from cc3d.core.simservice import service_cc3d
from cc3d.core.PySteppables import SteppableBasePy

class TrackerSteppable(SteppableBasePy):
    """
    Simple steppable that initializes a cell at an externally specified location,
    and reports the location of the cell back to the external environment whenever the simulation finishes.
    """
    def __init__(self, frequency=1):
        super().__init__(frequency=frequency)
        self.cell_id = None

    def start(self):
        """Initializes a cell at an externally specified location"""
        cell_pos = self.external_input  # Get data on the simulation property `sim_input`
        new_cell = self.new_cell(self.cell_type.CellType)
        self.cell_id = new_cell.id
        for i in range(5):
            for j in range(5):
                self.cell_field[cell_pos[0] + i, cell_pos[1] + j, cell_pos[2]] = new_cell

    def finish(self):
        """Reports the location of the cell back to the external environment"""
        cell = self.fetch_cell_by_id(self.cell_id)
        self.external_output = cell.xCOM, cell.yCOM, cell.zCOM  # Set data on the simulation property `sim_output`

def main():
    sims = []       # Container of all running simulations
    locs_init = []  # Container of all initial cell locations
    for i in range(10):             # Instantiate ten concurrent simulations
        loc = i + 10, i + 10, 0     # Initial cell location
        cc3d_sim = service_cc3d()   # Create the simulation instance
        cc3d_sim.register_specs(specs)
        cc3d_sim.register_steppable(steppable=TrackerSteppable)
        cc3d_sim.run()              # Run the process with the simulation; nothing is available until after this
        cc3d_sim.sim_input = loc    # Set data on steppable property `external_input`
        cc3d_sim.init()
        cc3d_sim.start()
        locs_init.append(loc)       # Store the initial location
        sims.append(cc3d_sim)       # Store the simulation
    for _ in range(10000):                      # Execute 10k steps
        [cc3d_sim.step() for cc3d_sim in sims]  # Execute step on each simulation
    [cc3d_sim.finish() for cc3d_sim in sims]                # Finish all simulations
    locs_fin = [cc3d_sim.sim_output for cc3d_sim in sims]   # Collect all final cell locations

if __name__ == '__main__':  # Guard for multiprocessing
    main()
Steppables have the property specs for steering capability using the CC3D Python API.
In general, when a simulation is instantiated using objects from the cc3d.core.PyCoreSpecs module,
each object is available by registered name as a property on the specs property and functions in
the same way.
The registered name of each cc3d.core.PyCoreSpecs is defined on the class attribute registered_name.
For example, LengthConstraintPlugin from cc3d.core.PyCoreSpecs has the registered name
length_constraint, and so any custom steppable executed in a simulation with LengthConstraintPlugin
can access the LengthConstraintPlugin instance with self.specs.length_constraint,
from cc3d.core.simservice import service_cc3d
from cc3d.core.PySteppables import SteppableBasePy

num_steps = 10000

class LengthConstraintSteppable(SteppableBasePy):
    """A steppable that increases the target length of a length constraint during simulation"""

    def start(self):
        """Records the initial target length for the "Noncondensing" cell type"""
        self.target_length_init = self.specs.length_constraint["NonCondensing"].target_length

    def step(self, mcs):
        if mcs % 100 == 0:
            target_length = self.target_length_init * (1.0 + mcs / num_steps)               # Calculate new length
            self.specs.length_constraint["NonCondensing"].target_length = target_length     # Apply new length
            self.specs.length_constraint.steer()                                            # Update the backend
The CC3D Python API supports CC3DSimService proxy interface customization through the
SimService service function.
A service function is a simulation-specific proxy interface method that passes arguments to
an underlying server-side CC3DSimService instance method, and returns the returned value
of the server-side CC3DSimService instance method on the client side.
Conversely, a simulation can add an internal method to its proxy when a CC3DSimService
instance and proxy are created through service_cc3d by declaring
a method as a service function. When a simulation declares a method as a service function,
a method of the same signature is added to each proxy when a CC3DSimService instance
and proxy are created through service_cc3d.
Warning
A service function only works when all data passed through the service function can be serialized.
A simulation can declare a method as a service function by passing it to service_function.
For each CC3DSimService proxy, each service function declared by its simulation is available
immediately after the simulation declares the service function and can be used on the proxy as
if calling the underlying simulation method.
For example, a simulation can add service functions to present an interface for steering by
implementing methods that handle changes to simulation parameter values and then declaring
those methods as service functions,
from cc3d.core.simservice import service_cc3d, service_function
from cc3d.core.PySteppables import SteppableBasePy

# Core specs initializations here, including a LengthConstraintPlugin instance...

class LengthConstraintControlSteppable(SteppableBasePy):

    def start(self):
        """Adds method `set_parameters` to simulation service interface"""
        service_function(self.set_parameters)

    def set_parameters(self, cell_type_name: str, target_length: int, lambda_length: float):
        """Updates the parameters of the length constraint on demand"""
        self.specs.length_constraint[cell_type_name].target_length = target_length
        self.specs.length_constraint[cell_type_name].lambda_length = lambda_length
        self.specs.length_constraint.steer()

def main():
    sims = []       # Container of all running simulations
    for i in range(10):                 # Instantiate ten concurrent simulations
        cc3d_sim = service_cc3d()       # Create the simulation instance
        cc3d_sim.register_specs(specs)  # `specs` includes a `LengthConstraintPlugin` instance
        cc3d_sim.register_steppable(steppable=LengthConstraintControlSteppable)
        cc3d_sim.init()
        cc3d_sim.start()                # Service function is added here
        cc3d_sim.set_parameters(i, 2)   # Set the length constraint for this instance with the service function
        sims.append(cc3d_sim)           # Store the simulation

if __name__ == '__main__':  # Guard for multiprocessing
    main()
CC3D in Jupyter Notebook
The CC3D Python API readily supports simulation work in a Jupyter Notebook.
Most aforementioned functionality of the Python API works as described in
a Jupyter Notebook, with a few exceptions and additions.
Concurrent simulation through service_cc3d is not supported, and so
a Jupyter Notebook can only implement a single simulation at a time.
CC3DSimService also provides an additional method jupyter_run_button,
which returns an ipywidgets toggle button that pauses and resumes a simulation.
from cc3d.CompuCellSetup.CC3DCaller import CC3DSimService
from IPython.display import display

cc3d_sim = CC3DSimService()
# Simulation specification here...
cc3d_sim.visualize()                    # Show a visualization frame
display(cc3d_sim.jupyter_run_button())  # Show a toggle button to pause/resume simulation
Within Jupyter Notebook, CC3D provides functionality for viewing and controlling a simulation interactively.
.. The CC3DSimService.visualize function returns the visualization frame, which can be put into a
The CC3DJupyterGraphicsFrameGrid can hold any number of visualization frames (returned by the visualize function).
This FrameGrid is useful for watching multiple different fields as the simulation runs.
Set the position of frames inside FrameGrid using coordinates starting at 0,0 at the top left corner.
Frame Grid Coordinates |
||||
|---|---|---|---|---|
0,0 |
0,1 |
0,2 |
… |
0,n |
1,1 |
1,1 |
1,2 |
… |
1,n |
2,0 |
2,1 |
2,2 |
… |
2,n |
… |
… |
… |
… |
… |
n,0 |
n,1 |
n,2 |
… |
n,n |
The FrameGrid also has a method control_panel(), which will display a graphical interface for
controlling simulation settings during runtime.
from cc3d.core.GraphicsUtils.JupyterGraphicsFrameWidget import CC3DJupyterGraphicsFrameGrid

frame_field1 = cc3d_sim.visualize()
frame_field2 = cc3d_sim.visualize()
frame_field1.set_field_name('MyField1')  # optional; field can also be set through the control panel
frame_field2.set_field_name('MyField2')  # optional; field can also be set through the control panel

frame_grid = CC3DJupyterGraphicsFrameGrid(rows=1, cols=2) # 1x2 grid
frame_grid.set_frame(frame_field1, 0, 0)  #  left frame
frame_grid.set_frame(frame_field2, 0, 1)  # right frame

frame_grid.control_panel()  # optional; show graphical interface for interacting with simulation

frame_grid.show() # show the frame grid widget
Here is an example screenshot of the control panel and frame grid based on the bacterium_macrophage demo:
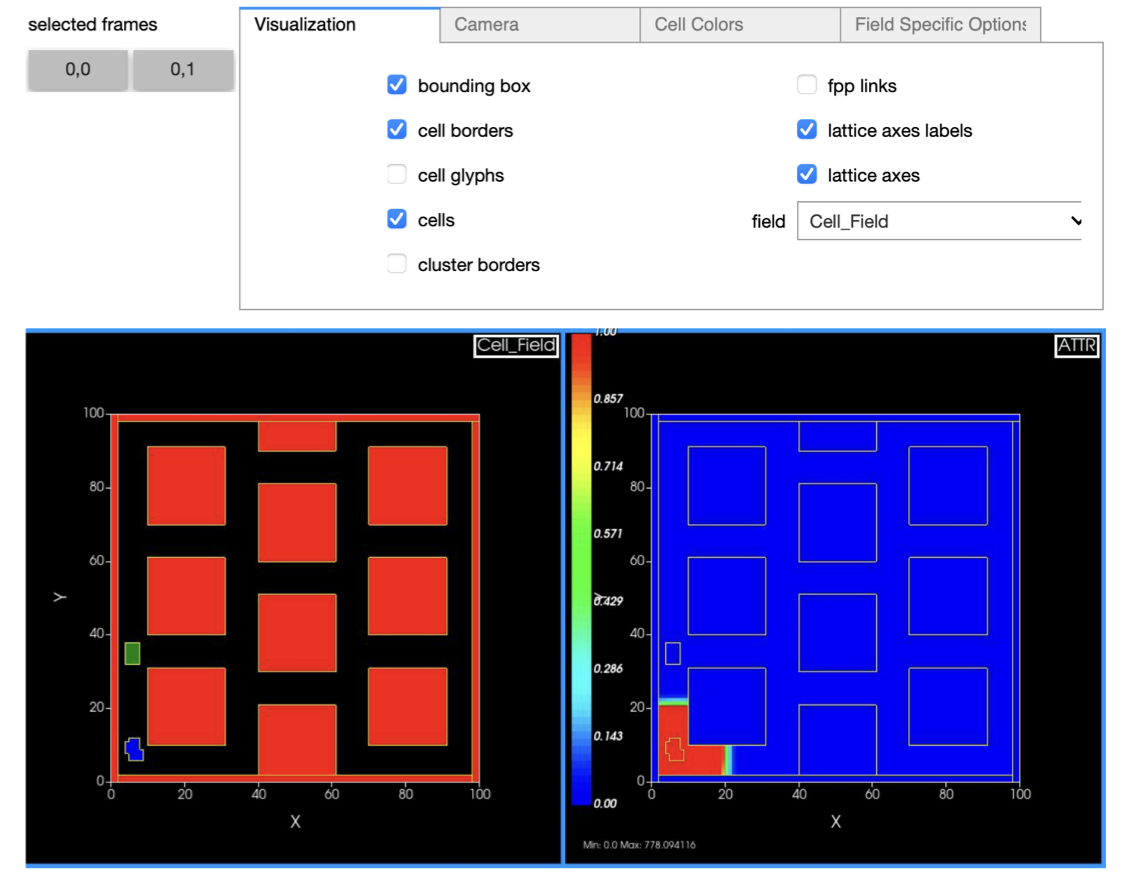
The settings on the control panel will only apply to active selected frames. Use the buttons to toggle which frames are active.